


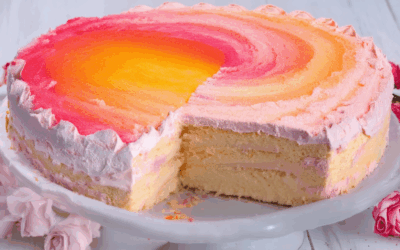
Transforming a simple cake into a festive and elegant masterpiece is achievable with the versatile medium of fondant. Whether you’re a seasoned baker or new to the craft, mastering the art of decorating cakes with fondant opens up a world of creative possibilities. From birthdays and weddings to holidays and special anniversaries, fondant allows you to craft stunning designs that captivate the eye and delight the taste buds. This guide delves into expert tips, step-by-step techniques, and innovative ideas to help you create fondant-decorated cakes that are as visually impressive as they are delicious. Discover how to work with fondant, troubleshoot common challenges, and explore a wide array of designs perfect for every occasion. With the right tools and a bit of patience, you’ll be ready to elevate your baking skills and impress your family and friends with showstopping fondant creations.
Key Takeaways
– Fondant Icing Can Be Applied Directly to Cakes: Achieve a sleek finish by preparing the cake surface and using proper technique.
– Frosting May Be Necessary for Uneven Cakes: Apply a thin layer of frosting first to ensure adhesion and prevent shifting.
– Dense Cakes May Not Need Frosting: Fondant adheres well to dense or pound cakes, while soft cakes often require a stabilizing layer of frosting.
– High Humidity Can Affect Fondant: Use a non-stick mat or a dab of frosting under the cake to prevent sliding.
– Fondant Offers Versatile Decoration Options: Transform plain cakes into festive masterpieces with flowers, borders, leaves, and other decorative elements.
– Professional Results Require Proper Preparation: Smooth the fondant layer and enhance finishes with powdery sugar or edible glitter for elegance.
How to Decorate a Cake with Fondant for Beginners
Fondant decorating is a fun and creative way to elevate your cake designs. Whether you’re working with a simple cake or a complex tiered cake, follow these steps to achieve professional-looking results.
Step 1: Prepare Your Cake
Bake and cool your cake(s) according to the recipe instructions. Make sure the cake is completely cooled before applying fondant to prevent sticking.
Step 2: Gather Your Tools
- Fondant
- Cake boards or serving plates
- Pastry brush
- Spatula
- Smoothing tool or cake scraper
- Decorator’s wire or edible markers
- Gel food coloring or liquid food coloring
Step 3: Apply Fondant
Place a small piece of fondant in your hand. Lightly dust your surface with powdered sugar to prevent sticking. Roll the fondant into a ball, then flatten it slightly.
Using your pastry brush, spread a thin layer of fondant over the cake. Smooth it evenly with your spatula or smoothing tool, working from the top down. Let it set for 10-15 minutes before adding details.
Step 4: Add Details
Once the fondant is partially set, use your decorator’s wire or scissors to cut out shapes, letters, or decorative edges. Gently press these onto the cake.
For flowers or intricate designs, pipe a small amount of fondant around the base of each flower petal or detail and attach with a pin.
Step 5: Enhance with Colors
Dip your decorator’s tip in gel food coloring and pipe small dots or lines around the cake for a polished look. Alternatively, use liquid food coloring for a more vibrant effect.
Step 6: Final Touches
Add finishing touches like sugar pearls, edible glitter, or fondant flowers for extra flair. Remember to keep everything proportional to the size of your cake.
Pro Tips:
- Work in a cool, dry place to prevent fondant from melting or sliding.
- Roll fondant between sheets of parchment paper for easier handling.
- Practice on scrap cake boards before decorating your masterpiece.
- Don’t overwork the fondant; it may become too warm and slide off.
With patience and practice, you’ll master the art of fondant decorating. Happy baking and enjoy your creations!
Looking for more inspiration? Explore our cake decorating tutorials and discover countless ways to beautify your cakes.
Want to learn more advanced techniques? Check out our guides on fondant decorating techniques .
How to Get Fondant to Stick to Your Cake
To successfully attach fondant to your cake, follow these organized steps:
- Choose the Right Type of Fondant : Opt for pouring fondant, known for its thickness and adherence, rather than rolling fondant, which is softer and may not hold as well.
- Prepare the Cake : Ensure the cake is completely cooled to avoid warmth interfering with the fondant’s adhesion. Clean the cake’s surface thoroughly to eliminate crumbs and ensure a smooth base.
- Apply the Fondant : Gently spread the pouring fondant evenly over the cake using a palette knife or spatula. Work in a systematic manner, covering the top and sides methodically.
- Use a Dowel for Support : Insert a wooden dowel down the center of the cake to provide structural support, aiding in the fondant’s stability.
- Create a Crumb Coat : Apply a thin layer of buttercream or icing around the cake’s edges to create a seamless foundation for the fondant, enhancing adhesion.
- Consider Temperature Control : Work in a cool environment to prevent the fondant from melting or sliding. Ensure the cake and workspace are at a comfortable temperature.
- Smooth and Press : Use a damp cloth to smooth the fondant and press it firmly against the cake to ensure it adheres properly without air bubbles.
- Trim for Fit : If necessary, trim the fondant to fit the cake’s shape, focusing on covering the edges neatly.
- Store Properly : Keep the decorated cake refrigerated until serving to maintain fondant integrity and prevent melting.
By following these steps, you can achieve a well-adhered fondant coverage, creating a professional-looking cake decoration.
What Do You Put Under Fondant on a Cake?
To ensure your fondant-covered cake looks professional and lasts longer, apply a thin, even layer of buttercream underneath. This creamy base provides a smooth surface that prevents the fondant from absorbing too much moisture and helps it adhere better to the cake.
The buttercream should be slightly sweetened to complement the cake’s flavor, though the exact sweetness can be adjusted based on your preferences. Ensure the buttercream is not too thick, as this may lead to lumps or uneven coverage. For best results, apply it evenly with a spatula and allow it to set slightly before adding the fondant to avoid sliding.
By taking these simple steps, you’ll create a stable foundation that supports the fondant and enhances the overall appearance of your dessert.

Can You Put Fondant Icing Straight Onto a Cake?
Fondant icing can indeed be applied directly to a cake, but success depends on proper preparation and technique. Here’s what you need to know:
Steps for Applying Fondant Directly
- Prepare the Cake Surface: Clean and dry the cake surface thoroughly. A slightly damp cloth can help remove any crumbs or residue.
- Apply Fondant: Spread a thin layer of fondant evenly over the cake using a spatula. Start from the center and work outward, smoothing with the edge of the spatula.
- Smooth and Shape: Use an offset spatula or your fingers to shape the fondant into a smooth, even layer. Let it set slightly before adding details.
When to Use Frosting
If your cake is uneven or has a soft texture, apply a thin layer of buttercream or frosting first to create a smooth base for the fondant. This ensures better adhesion and prevents shifting.
Considerations for Success
- Cake Type: For dense or pound cakes, fondant may adhere well without frosting. Soft cakes often require frosting for stability.
- Weather: High humidity can cause fondant to slide. Consider using a dab of frosting or a non-stick mat underneath if needed.
Tools and Resources
For professional results, check out Tort Decor’s Fondant Tutorials and explore our selection of cake decorating tools .
By following these tips, you can successfully apply fondant icing straight onto a cake, achieving a sleek and professional finish.
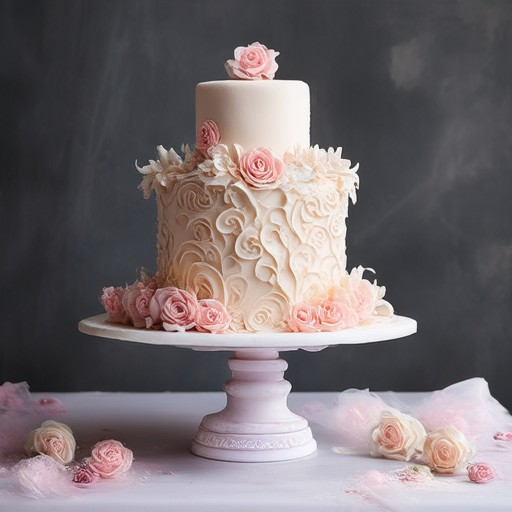
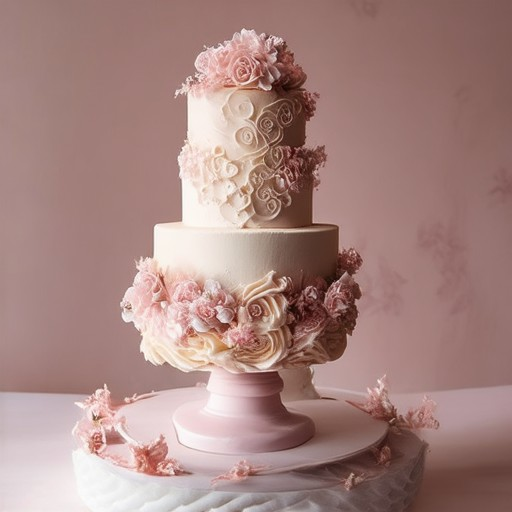
How to Decorate a Cake with Fondant for a Festive Occasion
- Prepare Your Cake Base:
- Ensure your cake is well-cooled to prevent slipping when applying fondant.
- Level the cake’s surface with a damp sponge or knife for a smooth base.
- Apply the Fondant Layer:
- Warm the fondant slightly to make it pliable but not too sticky.
- Place a small amount of fondant on the center of the cake, spreading it evenly with your fingers or a spatula.
- Gently press the fondant onto the cake, smoothing it around the edges with a flat tool or your hands.
- Create a Smooth Surface:
- Use a bench scraper or the back of a spoon to create a sharp edge along the bottom of the fondant layer.
- Smooth the top and sides of the fondant by gently moving it back and forth with your fingers or a scraper.
- Add Decorative Elements:
- Fondant Flowers:
- Roll small portions of fondant between your hands to create flower shapes.
- Use a flower cutter or cookie cutters to shape petals and place them on the cake.
- Dip a fine-tipped paintbrush or toothpick into edible glitter and brush it over the flowers for sparkle.
- Fondant Borders:
- Roll out a thin strip of fondant and cut it into long, curved strips for a decorative border.
- Arrange the strips around the cake’s edges, overlapping slightly at the corners.
- Fondant Leaves:
- Shape fondant into small leaf shapes using a cutter or your fingers.
- Arrange the leaves randomly around the cake for a natural look.
- Fondant Flowers:
- Finish with Edging and Dusting:
- Apply a thin line of fondant around the cake’s edges for a polished finish.
- Dust the cake with powdery sugar or edible glitter for a final touch of elegance.
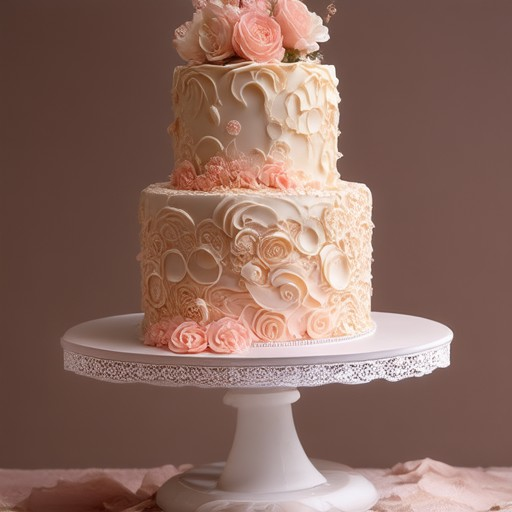
How to Decorate a Cake with Fondant for a Festive Occasion
Fondant decorating is a versatile and elegant method for transforming plain cakes into show-stopping creations perfect for celebrations. Below is a step-by-step guide to help you achieve professional-looking fondant decorations:
- Prepare Your Tools and Ingredients:
- Fondant sheets or rolled-out fondant
- Cake smoozer or spatula
- Flower cutters, stamps, or cookie cutters
- Gel food coloring
- Brushes (soft for detail work)
- Dustings (powdered sugar or edible glitter)
- Smooth Out the Fondant: Knead a small portion of fondant until it becomes pliable. Roll it out thinly on a clean surface dusted with powdered sugar to prevent sticking. Place it over the cake and gently smooth it with your fingers or a cake smoother.
- Create Decorative Elements: Use flower cutters or cookie stamps to create shapes and patterns. Gently press these onto the fondant-covered cake. For intricate designs, consider adding details with a fine-tipped brush or by piping small amounts of fondant.
- Add Borders or Frames: Roll out a thin strip of fondant and place it around the edge of the cake for a decorative border. You can also create a frame using cutouts or lattice work for a more elaborate look.
- Enhance with Edging: Apply a border of fondant around the top and bottom edges of the cake for a polished finish. Use a sharp knife or scissors to create clean edges.
- Final Touches:
- Dust the cake liberally with powdered sugar or edible glitter for a sparkling effect.
- Add final details using colored fondant or gel food coloring for a pop of color.
- Consider Alternative Methods: If you prefer a smoother look, try using pre-colored fondant sheets available in various colors. For a more detailed design, layer different shades of fondant to create depth and dimension.
- Get Inspired by Trends: Popular cake decorating trends include geometric patterns, floral motifs, and metallic accents. Incorporate these elements by using stencils or molds to achieve a modern aesthetic.
With these tips, you can transform your cake into a festive centerpiece that will impress guests at any gathering. Remember to experiment with colors and textures to create a unique look that matches your event’s theme.
For more fondant decorating techniques and inspiration, visit our Fondant Decorating Tutorials section on Tort Decor. Explore our collection of expert-led guides and video tutorials to elevate your cake decorating skills.

0 Comments