


Discover how to elevate your dessert game with innovative edible glitter techniques, transforming ordinary cakes into extraordinary creations. Whether you’re a seasoned baker or new to the craft, these glitter techniques offer a dazzling way to add shimmer and sophistication to your cakes. From enhancing the aesthetic appeal to impressing your guests, learn how to incorporate edible glitter seamlessly into your dessert projects. This guide delves into essential tips, creative ideas, and step-by-step guides to help you master the art of using glitter for stunning results. Explore how to achieve vibrant colors, intricate textures, and unique effects that will leave your cakes looking as good as they taste.
Key Takeaways
– Efficient Application Methods: Learn effective ways to apply edible glitter to cupcakes, cookies, and cakes for a sparkling effect.
– Vibrant Color Retention: Discover how to keep edible glitter bright using binders like corn syrup or honey.
– Stable Options: Understand why water-based edible glitter is preferable for durability and color accuracy.
– Proper Handling Tips: Master techniques to apply glitter evenly and avoid smudging, ensuring professional-looking results.
– Optimal Storage Solutions: Store baked goods in airtight containers to maintain glitter’s color and texture.
How to Make Edible Glitter
Edible glitter is a fun and decorative ingredient used in baking and dessert-making. Here’s a simple guide to creating your own:
- Materials Needed: – Isomalt powder – Water – Food-safe coloring (optional) – Flavoring (optional)
- Preparation: 1. In a saucepan, mix isomalt powder with a small amount of water to form a slurry. 2. Heat the mixture over medium heat, stirring constantly until fully dissolved. 3. Cool the mixture slightly, then pour it onto a flat surface to begin forming crystals. 4. Use a fork to stir and encourage the crystals to form evenly.
- Drying: 1. Place the wet crystals in a dehydrator or low-heat oven (around 140°F or 60°C) to dry completely. 2. Once dry, the crystals can be shaped into smaller chunks or broken into individual pieces for use.
- Coloring and Flavors: 1. Add food-safe coloring to the warm solution before cooling for vibrant colors. 2. Optionally, add flavoring during the cooling process for a tasty twist.
- Application Tips: 1. Melt a small amount of butter or oil in a separate pan. 2. Slowly incorporate the edible glitter into the melted liquid, stirring thoroughly to combine. 3. Use as a decorative topping for cakes, cookies, or other baked goods for a sparkling effect.
- Alternatives: – If isomalt isn’t available, tapioca powder or corn syrup can be used as substitutes, though the texture may vary.
- Storage: – Store finished edible glitter in an airtight container in a cool, dry place to prevent clumping.
What Makes Edible Glitter Shiny?
The shine of edible glitter is primarily determined by several factors:
- Particle Size : Small, uniform particles reflect and scatter light more effectively, contributing to a shiny appearance.
- Even Distribution : Proper spreading ensures light hits multiple surfaces, enhancing the sparkle.
- Color Reflection : Colors like silver and gold, which reflect light closely to the human eye, enhance shininess.
- Surface Texture : Smooth surfaces allow efficient light reflection, boosting brightness.
- Application Method : Fine sprays or mists provide better coverage and shine.
- Environmental Factors : Lighting conditions significantly impact perceived shininess.
These elements collectively create the sparkling effect associated with edible glitter.

When to Apply Edible Glitter to Cookies
To achieve the best results when decorating cookies with edible glitter, it is recommended to apply the glitter after baking. Here’s why:
- Adhesion: Applying glitter after baking allows the edible glitter to adhere properly to the cookie’s surface. The heat from baking can sometimes affect the glitter’s texture, making it less effective if applied beforehand.
- Control: By waiting until after baking, you gain better control over the placement and distribution of glitter, ensuring a smooth and even finish.
- Safety: Adding glitter before baking may lead to uneven distribution or potential damage caused by the oven’s heat. Post-baking application minimizes these risks.
For optimal results, apply a thin layer of royal icing to your baked cookies and then gently dust the glitter over the icing. This method ensures the glitter adheres well and adds a sparkling touch to your treats.

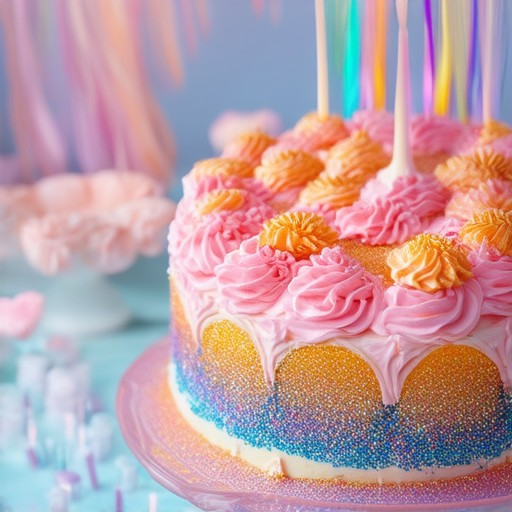
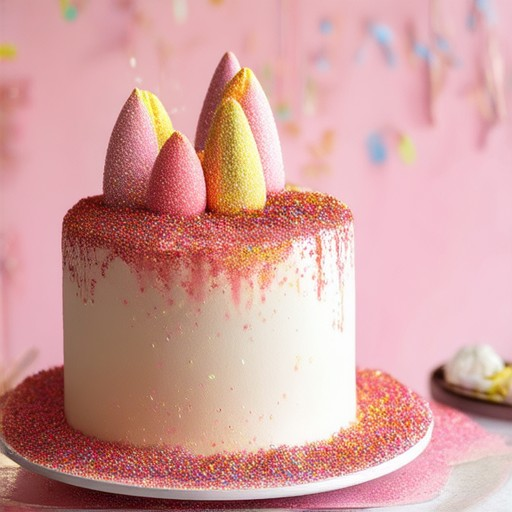
How to Apply Edible Glitter
Edible glitter adds a festive touch to various baked goods and desserts. Here’s a step-by-step guide to applying it effectively:
- On Cupcakes and Cookies: Hold the cupcake or cookie in place with a spacer or your finger. Gently brush a small amount of edible glitter onto the frosted surface using a paintbrush or your finger. For a more intense sparkle, apply multiple thin layers.
- On Cakes and Frosting: Start by smoothing an even layer of frosting on your cake. Dip a paintbrush into the edible glitter and swipe it across the frosting. Work in quick strokes for a shimmering effect. For a more dramatic look, apply the glitter along borders or design elements.
- As Icing Decorations: Mix a small amount of edible glitter into your icing for a shimmering finish. Pipe the glitter-imbued icing onto cookies, cupcakes, or cake decorations for a polished look.
Tips for Best Results
- Apply edible glitter when your surface is cool to prevent melting or smudging.
- Use fine or ultra-fine glitter for a subtle shine, or choose coarse glitter for a more dramatic effect.
- Mist the surface lightly with water before applying glitter for better adhesion.
- Experiment with different colors and combinations to achieve unique designs.
For more creative ideas and professional tips, visit our Tort Decor resource hub.
How to Make Edible Glitter Stay Vibrant After Baking
To ensure your edible glitter remains vibrant after baking, follow these expert tips:
- Use a Binder: Mix edible glitter with a binding agent like corn syrup or honey . This helps the glitter adhere to surfaces and prevents it from melting or separating during baking.
- Opt for Water-Based Glitter: Choose water-based edible glitter over oil-based options. Water-based varieties tend to hold color better and blend more smoothly with baked goods.
- Apply Evenly: Brush the glitter onto your baked goods using a fine brush or applicator. Ensure even coverage to avoid uneven baking effects and to maintain consistency in color vibrancy.
- Seal with UV Protectant: Apply a UV protectant spray after baking. This helps preserve the glitter’s color and prevents fading from sunlight or heat.
- Store Properly: Keep the glitter in an airtight container . Store in a cool, dry place to prevent it from drying out or losing color due to exposure.
By incorporating these techniques, you can ensure your edible glitter stays bright and colorful, making your baked creations even more eye-catching!
How to Make Edible Glitter Stay Vibrant After Baking
To keep edible glitter vibrant after baking, follow these expert tips:
- Use a Binder: Mix edible glitter with a binding agent like corn syrup or honey . This creates a gel-like texture that resists melting and keeps colors bright.
- Opt for Water-Based Glitter: Choose water-based edible glitter over oil-based options. Oil can separate and lose color when exposed to heat, making water-based varieties more stable.
- Apply Evenly: Use a fine brush or icing bag to apply glitter uniformly. Thick layers may lead to uneven drying and color loss, so aim for consistent coverage.
- Store Properly: Keep decorated goods in an airtight container . Exposure to air can cause glitter to lose color and texture over time.
For best results, experiment with different binders and glitter types to find what works for your specific project. Consider consulting professional cake decorators or referring to detailed tutorials for advanced techniques.

0 Comments