


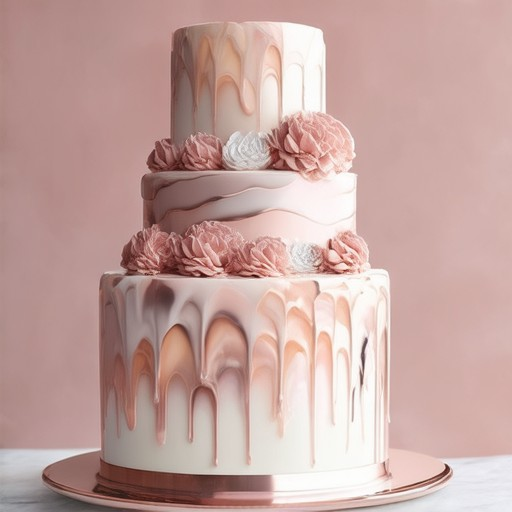
Creating a seamless mirror glaze cake tutorial is a fantastic way to elevate your baking skills and transform ordinary cakes into stunning visual masterpieces. Whether you’re a seasoned baker or just beginning, mastering the art of mirror glaze can add a polished, professional touch to your desserts. This versatile technique allows you to achieve a glossy, reflective finish that enhances both the texture and appearance of your baked goods. In this comprehensive guide, we’ll explore everything you need to know about crafting the perfect mirror glaze, including essential ingredients, step-by-step instructions, and expert tips for achieving that coveted shiny effect. From understanding the basics to discovering popular recipes and learning how to apply the glaze like a pro, this tutorial has you covered. Dive in and unlock the secrets to creating mirror-glazed cakes that are as beautiful as they are delicious!
Mirror Glaze Cake Tutorial: Achieving a Shiny, Elegant Finish
Creating a mirror glaze cake involves a few thoughtful steps to ensure a smooth, shiny finish. Here’s a concise guide:
Ingredients:
- Gelatin: For flexibility and shine.
- Sugar: Adjusts sweetness and texture.
- Lemon Juice: Enhances dissolution and adjusts pH.
- Food Coloring: Optional for color variety.
Preparation:
- Bloom Gelatin: Dissolve gelatin in warm water, stirring until fully expanded.
- Combine Sugar and Lemon Juice: Mix thoroughly to create air bubbles for a smooth texture.
Heating the Glaze:
- Heat the mixture to around 190°F, using a candy thermometer to monitor.
- Stir continuously to avoid clumps, ensuring even heating.
Application:
- Warm Cake: Apply the hot glaze to a warm cake using a spatula for even spreading.
- Settle Glaze: Allow to set without disturbance; consider refrigerating for faster setting.
Variations & Tips:
- Colors: Add food coloring for vibrant hues.
- Textures: Experiment with different sugars for varied finishes.
- Tools: Use a spatula and parchment paper to aid spreading and prevent sticking.
Consistency:
- Adjust gelatin and sugar amounts for desired thickness and shine.
Additional Considerations:
- Ratios: Refer to standard ratios for precise measurements.
- Taste: Balance with vanilla or citrus to complement flavors.
- Pan Type: Use non-stick pans for easier handling.
By following these steps, you can achieve a professional-looking mirror glaze, transforming your cakes into dazzling treats. Enjoy experimenting with different variations to create unique, elegant desserts!
How to Create a Mirror Glaze for a Cake
Ingredients
- Sugars: Glucose syrup, isomalt, or a mixture of sugar and lemon juice for shine
- Silver leaf (optional): For a metallic effect
- Binder: Egg white or gelatin
- Water or lemon juice (for shine)
- Flavor extracts (optional): Vanilla, citrus, or chocolate
- Tools: Double boiler, fine mesh sieve, pastry brush or angled spatula
- Safety gear: Gloves, goggles, hair cover
Instructions
- Prepare the Cake Base:
- Cool the cake completely on a wire rack to ensure it’s sturdy and cool before applying the glaze.
- Mix Sugars:
- In a saucepan, combine glucose syrup or isomalt. Heat on low until fully dissolved. Add sugar for sweetness and a pinch of salt for balance. Optionally, add lemon juice for extra shine.
- Infuse Color and Shine:
- Gently stir in silver leaf or edible glitter for a shimmering effect. For a less traditional look, mix in edible glitter or luster dust instead of silver leaf.
- Add Binder:
- Gradually mix in beaten egg white or dissolved gelatin while continuing to heat and stir. This step ensures the glaze sets properly without separating.
- Thicken the Glaze:
- Continue heating until the mixture thickens and becomes glossy. Avoid burning by maintaining controlled heat.
- Apply the Glaze:
- Pour the prepared glaze over the cake and use a fine mesh sieve for a smooth application. Brush evenly with a pastry brush or angled spatula, working in a steady motion to avoid streaks.
- Set and Serve:
- Allow the glaze to set for at least 30 minutes before serving. The glaze will harden slightly, giving the cake a glossy finish and preventing it from sliding. For best results, let it sit for up to 2 hours depending on room temperature.
Tips
- Alternative Methods: Achieve a mirror effect without silver leaf by mixing sugar with a splash of lemon juice or vinegar for natural shine.
- Presentation: Enhance visual appeal with complementary garnishes like edible flowers, gold dust, or fresh berries.
- Storage: The glaze will keep the cake moist and extend its freshness. Store uneaten portions in an airtight container.
- Competitor Resources: For detailed tutorials and ingredient guides, visit Wilton or SugarFlair for professional-level techniques.
Conclusion
By carefully following these steps and using the right ingredients and tools, you can achieve a professional-looking mirror glaze, transforming your cake into a showstopper.
How to Create a Mirror Glaze for Cake
Ingredients
- Sugar
- Glucose syrup or invert sugar
- Egg whites or gelatin as a binding agent
- Water
- Flavorings (vanilla extract, fruit juices)
Instructions
- Prepare the Cake Base: Ensure your cake is fully cooled and has a smooth surface. Clean the cake’s top thoroughly to remove any crumbs or obstructions.
- Make the Glaze:
- Mix sugar and glucose syrup (or invert sugar) in a saucepan. Add a small amount of water to adjust the consistency.
- For a firmer glaze, dissolve gelatin in cold water and stir into the sugar mixture. For a smoother texture, whip egg whites until frothy and fold them into the glaze.
- Add flavorings like vanilla extract or fruit juice to the glaze mixture for a customized taste.
- Apply the Glaze:
- Heat the glaze gently until it reaches a pourable consistency, avoiding boiling to prevent thickening excessively.
- Using a pastry brush or offset spatula, spread the glaze evenly over the cake’s surface. Focus on the edges for a polished look, ensuring smooth coverage.
- Set the Glaze:
- Smooth the surface with a spatula to eliminate air pockets and create a seamless finish.
- Allow the glaze to set for at least 30 minutes to an hour, depending on its thickness. Longer setting times may be needed for thicker layers.
Optional Enhancements
- Add a touch of gold or silver dust for an elegant finish.
- Pipe decorative patterns or borders using a piping bag fitted with a fine tip.
Tips for Success
- Ensure the cake is completely cool before glazing to prevent sliding or smudging.
- Avoid overheating the glaze to prevent burning or caramelization.
- Keep tools sharp and clean for a professional finish.
Resources for Advanced Techniques
- Explore advanced cake decorating methods on Tort Decor.
- Find detailed mirror glaze recipes and tutorials .

How to Make a Mirror Glaze for Cake
A mirror glaze adds a shiny, luxurious finish to your baked goods, making them look professionally decorated. Here’s a step-by-step guide to achieving this elegant effect:
Ingredients
- 3 large egg whites
- 2 tablespoons clear corn syrup
- 1 teaspoon vanilla extract
- 1/4 cup powdered sugar
- 1 teaspoon food-grade silver edible glitter (optional)
- Pinch of salt
Steps to Prepare the Glaze
- Whip Egg Whites: In a large bowl, beat the egg whites until they form stiff peaks. This creates volume and structure for the glaze.
- Mix Ingredients Gradually: Slowly incorporate the corn syrup, followed by vanilla extract, powdered sugar, and salt. Start with a tablespoon of powdered sugar to adjust sweetness before adding more.
- Add Glitter for Shine: If using, stir in edible glitter until fully integrated. Avoid overmixing to maintain the glaze’s shine and prevent it from becoming too runny.
Applying the Glaze
- Frost the Cake First: Ensure your cake has a smooth frosting layer, like a crumb coat, to create a base for the glaze and hide any imperfections.
- Spread the Glaze Evenly: Using a clean pastry brush or offset spatula, carefully apply the glaze in a thin, even layer across the top and sides of the cake. Work in smooth strokes to avoid streaks.
- Set Under Heat: Place the cake under a preheated fan at a low setting for a few minutes. This helps the glaze set without melting or sliding off the cake.
Optional Enhancements
- Extra Shimmer: Sprinkle edible glitter on top of the glaze before it completely sets for an extra sparkle.
- Color Variations: For special occasions, consider using colored glazes. Just be aware that this may affect the transparency of the final finish.
Storing the Glaze
- Store the prepared glaze in an airtight container when not in use to maintain its texture and shine.
By following these steps, you’ll achieve a polished, mirror-like glaze that elevates your cake’s appearance. For more expert tips and detailed guides, explore our mirror glaze tutorial and ingredient guide .
How to Create a Mirror Glaze for Cake
Creating a mirror glaze for your cake involves a few simple steps and requires attention to detail to achieve that shiny, polished look. Here’s a step-by-step guide:
- Ingredients Needed:
- Gelatin
- Sugar
- Acidic ingredient (e.g., lemon juice)
- Food coloring (optional)
- Preparation:
- Bloom the gelatin by dissolving it in warm water.
- In a separate bowl, combine sugar and optional lemon juice.
- Mix thoroughly to dissolve sugar and incorporate air bubbles for a smoother texture.
- Heating the Glaze:
- Heat the mixture until the gelatin fully dissolves and the sugar incorporates smoothly.
- Stir continuously to avoid clumps and ensure even heating.
- Application:
- Pour the heated glaze over the warm cake using a spatula.
- Spread evenly in a thin layer, allowing it to set without immediate disturbance.
- Setting Process:
- Cool the cake in a cool place to prevent the glaze from sliding off.
- Optional: Use a blow dryer carefully to speed up the setting process, avoiding direct heat that could cause the glaze to melt or slide.
- For quicker setting, refrigerate after application.
- Variations:
- Customize the glaze with food coloring for different hues.
- Experiment with different types of sugar for varied textures and flavors.
- Tools:
- Use a spatula for even spreading.
- Consider using parchment paper to prevent the glaze from sticking to the cake pan.
- Consistency Tips:
- Adjust the amounts of gelatin and sugar to achieve your desired thickness and shine.
- Taste Consideration:
- Opt for subtle flavors like vanilla or citrus to complement the cake’s flavor profile.
By following these steps, you can achieve a smooth, shiny mirror glaze that enhances both the taste and presentation of your baked goods. For more expert tips and inspiration, explore our cake decorating tutorials and baking recipes .
How to Apply Mirror Glaze to a Cake
To achieve a polished, shimmering look on your cake, follow these steps for applying a mirror glaze:
- Gather Ingredients: You’ll need edible glitter, gelatin or agar-agar, heavy cream, vanilla extract, and food coloring (optional). Tools include a pastry brush and an acetate sheet.
- Prepare the Glaze: In a small saucepan, dissolve gelatin or agar-agar in water. Stir until fully dissolved. Mix in edible glitter, heavy cream, and vanilla extract. Add food coloring if desired for a shimmering effect. Let the mixture cool slightly before applying.
- Apply the Glaze: Once your cake has completely cooled, brush a thin, even layer of the prepared glaze onto the top and sides of the cake. Use a pastry brush for smooth coverage. Let it set for 15-20 minutes, allowing the glaze to harden and adhere to the cake.
- Set and Refrigerate: Place the cake in a refrigerator or cool place for about 15-20 minutes to allow the glaze to set. This will give it a glossy, jewel-like shine. Store the cake in an airtight container in the fridge for up to 3 days.
- Serving Suggestions: Remove the cake from the fridge 30 minutes before serving to let it reach room temperature, ensuring the glaze remains shiny and smooth.
For more detailed tutorials and cake decorating tips, visit Wilton or explore our cake decorating guides . Learn how to create stunning designs with mirror glazes and other decorative techniques!
How To Apply Mirror Glaze Like A Pro
To achieve a professional finish with mirror glaze, follow these steps:
- Preparation: Ensure your cake is completely cooled. Clean the surface thoroughly to remove any crumbs or defects. Use a fine sieve or gently blow away loose particles with a clean hairdryer.
- Glaze Ingredients: Mix isomalt or agar agar with water for a smooth, non-crystallizing finish. Add glycerin for texture adjustment. Follow the recommended ratio for your preferred sweetener to avoid crystallization.
- Application Technique: Using a fine brush or offset spatula, apply the glaze in a steady, circular motion. Start from the center and move outward, ensuring even coverage. Avoid air bubbles by working slowly and smoothly.
- Add Silver Leaf: Lightly brush edible silver leaf with a toothpick or brush. Apply a thin layer to avoid a tacky texture. Let it set according to the instructions, usually 24 hours under room temperature.
- Dry Time: Allow the glaze to fully set and harden before decorating. Rushing this step may cause smudging or loss of shine.
- Storage: Keep the decorated cake in a cool, dry place. Cover loosely with plastic wrap or store in an airtight container to prevent smudging.
Tools needed: Clean cake board or non-stick mat, fine brush, offset spatula, toothpick or brush for silver leaf application.
Consider alternatives like colored sugars or glitter if silver leaf is unavailable. Store-bought mirror glazes may offer convenience, though homemade versions can yield better results with practice.

0 Comments