


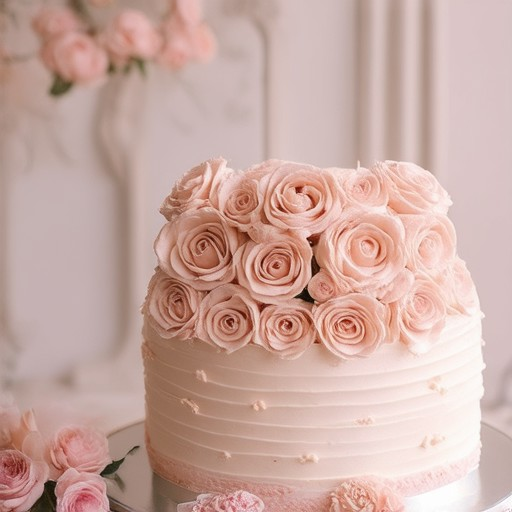
Transform your baked creations into works of art by mastering the technique of piping roses on cakes and cupcakes. Whether you’re a professional baker or a home cooking enthusiast, adding intricate floral designs to your desserts can elevate your presentation to new heights. In this comprehensive guide, we’ll explore everything you need to know about crafting perfect roses using various piping techniques, tools, and materials. From basic tips for beginners to advanced methods for creating realistic blooms, this article will provide you with actionable insights and expert advice to help you achieve stunning floral decorations. Discover how to pipe roses directly on cakes, experiment with different icing styles, and learn how to maintain freshness and prevent common mistakes. With the right guidance, you’ll be able to create elegant rose designs that will impress anyone who lays eyes on your beautifully decorated treats. Let’s dive into the world of floral piping and unlock the secrets to creating breathtaking rose decorations on cakes and cupcakes!
To successfully pipe roses on cakes and cupcakes, follow these organized steps:
- Tool Preparation:
- Invest in high-quality rose-shaped piping tips from reputable brands like Wilton or Ateco. Choose based on your desired rose size—wider tips for larger blooms, narrower for delicate ones.
- Use a fine-tipped pastry bag that fits your chosen tips comfortably.
- Technique Mastery:
- Grip and Pressure: Hold the pastry bag at a slight angle, similar to how you’d hold a paintbrush. Apply consistent pressure, avoiding blobs by releasing pressure as you lift the bag.
- Coloring Strategy: Mix your own buttercream for color variety. Use food coloring gels for vibrant hues. Achieve smooth transitions with a color wheel method for natural tones.
- Temperature Management:
- Keep buttercream at room temperature for optimal consistency. Avoid melting by chilling it briefly if needed.
- Practice and Precision:
- Practice on parchment paper to refine your technique. Study professional tutorials for petal formation and curvature.
- Application Process:
- Begin with a circular base on the cake. Gradually add petals, varying lengths for realism. Use a 45-degree angle to shape petals naturally.
- Design Enhancements:
- Ensure even spacing using templates or guides. Adjust tip size or pressure for varied rose sizes.
- Add details like leaves or stems using the same tip. Enhance with edible glitter or powdered sugar for sparkle.
- Buttercream Consistency:
- Opt for stiffer buttercream for detailed work. Adjust texture by beating longer or using less liquid. Warm slightly if needed for better control.
- Progressive Learning:
- Start with simple designs, gradually tackling more complex ones. Consider classes or reliable resources for further guidance.
By following these steps, you’ll achieve stunning rose designs, transforming your cakes and cupcakes into artistic creations.
How to Pipe Roses on a Cake
To pipe roses on a cake, follow these organized steps for a beautiful and professional finish:
- Prepare Your Tools:
- A decorated cake.
- Parchment paper for lining and protection.
- A pastry bag fitted with a Wilton 1M tip .
- Frosting (e.g., buttercream) prepared to the desired consistency.
- Set Up Your Workspace:
- Place the cake on a sturdy cake stand to prevent slippage.
- Line the cake stand with parchment paper for easy cleanup and protection.
- Frost the Cake:
- Apply a thin layer of frosting to the top of the cake to create a smooth base for decoration.
- Fill the Pastry Bag:
- Hold the pastry bag upright and twist gently to insert the Wilton 1M tip at the opening.
- Fill the bag with frosting, ensuring the tip is fully submerged and held firmly.
- Pipe the Rose Petals:
- Hold the pastry bag perpendicular to the cake, starting from the base of the rose design.
- Release pressure gradually to create circular or oval shapes for each petal, alternating directions for a natural look.
- Continue until all petals are placed, aiming for 5-8 petals for a full bloom.
- Add the Rose Stem:
- Use a thinner tip or a toothpick to create a stem at the base of the rose.
- Gently insert the stem into the frosted base for a realistic touch.
- Finishing Touches:
- Smooth any excess frosting with a damp cloth or spatula.
- Allow the frosting to set slightly before serving to firm up.
By following these steps, you can achieve stunning rose decorations on your cake, perfect for special occasions or elegant desserts.
How to Pipe Roses on Top of Cake
To pipe roses on top of a cake, follow these organized steps for a beautiful floral decoration:
- Prepare the Base Frosting: Start by mixing a stiff buttercream. This will hold the rose shapes securely. Adjust the consistency with milk or cream for the right texture.
- Create Petal Shapes: Using a piping bag with a small round tip, pipe out small amounts of frosting. Practice on paper to master the size and shape of each petal. Roll the piped frosting into cone shapes for the tips.
- Attach Petals to the Cake: Begin by placing a petal in the center. Surround it with other petals, ensuring even spacing. Gently press each petal into the cake to secure them in place.
- Smooth and Secure: Use a spatula to smooth the surface between petals and the cake. Add a central petal at the top for symmetry.
- Add Details: Enhance petals with fine lines for veins. Create a central cluster for added dimension without overcrowding.
- Consider Height and Support: For taller cakes, stack roses with decreasing sizes. Use wires or toothpicks for support if needed.
- Ensure Alignment: Mark positions with toothpicks or templates for even spacing and symmetry.
With patience and attention to detail, you’ll achieve a stunning rose design on your cake. Enjoy the process and the beautiful result!
How to Pipe Flowers on a Cake Easily
To pipe flowers on a cake, follow these simple steps:
- Gather Tools and Ingredients: Ensure you have a piping bag, disposable tips (petal-shaped for flowers), and prepared buttercream. Fit the tip onto the bag, inserting it at a downward angle.
- Prepare Buttercream: Mix butter, powdered sugar, milk, and vanilla extract until smooth. Adjust consistency with more milk if needed for thicker icing.
- Fit the Tip and Practice: Hold the bag perpendicular to the cake and practice squeezing to create petals on paper. This helps master the technique before decorating the cake.
- Pipe the Flowers: Start at the base of each petal, moving outward and upward. Keep pressure steady for uniform petals. Define centers by adding more icing with the tip or a smaller tool.
- Clean and Store: Rinse and clean the piping bag and tips after each use to prevent color blending. Store unused icing in a sealed container.
Practice patience and enjoy creating beautiful floral designs on your cake!
The Best Piping Tips for Roses
Creating perfect roses with frosting can be achieved using specialized piping tips designed specifically for this purpose. Here are some of the top recommendations:
- Wilton 4648 Piping Tip – Known for its curved edge, this tip is excellent for creating realistic rose shapes. Its design allows for easy manipulation to form petals and a central bloom.
- Ateco 849 Piping Tip – Renowned for its sharp edges, this tip is ideal for creating detailed roses. It works well for both small and large roses, offering precise control for intricate designs.
- Pastry Queen Rose Piping Tip – Specifically designed for realistic-looking roses, this tip mimics the texture and shape of real flowers, making it a favorite among professional decorators.
When choosing a tip, consider factors such as ease of use, durability, and how well it holds frosting. The size of the tip can also affect the final appearance, with wider tips creating larger blooms and narrower ones producing smaller, more delicate roses. Experiment with different tips to find the best fit for your style and project needs.
For purchasing options, these tips are widely available through baking supply stores online and locally. Ensure you order in advance if you’re preparing for an upcoming event to avoid delays.
How to Pipe Roses on a Cake
Creating elegant rose designs on a cake can be achieved with a few simple steps and the right techniques. Here’s a step-by-step guide:
- Tools Needed: Pastry bag, fine-tipped decorator tip, buttercream, and optional coloring tools.
- Color Selection: Use pre-colored buttercream tubes or mix your own colors for more flexibility. Consider using Wilton’s Color Right system for smoother color transitions.
- Temperature Control: Keep your buttercream at room temperature for easier piping. Too warm, and it may melt; too cold, and it could become lumpy.
- Practice First: Before attempting your cake, practice your rose shapes on parchment paper. Watch tutorials from professional decorators for perfect petal formation.
- Apply the Roses: Start by outlining a circle on the cake with your decorator tip. Fill in the center with smaller petals, working your way outward. Hold your bag at a 45-degree angle for natural-looking petals.
- Adjust Spacing: Use a template or guides to ensure even spacing. Adjust the size of your roses by changing the tip diameter or the pressure applied.
- Finishing Touches: Add details like leaves or stems using your decorator tip. Lightly dust with powdered sugar or edible glitter for a polished look.
For visual inspiration, check out our cake decorating tutorials or explore our recipe section for more ideas. Happy decorating!
How to Pipe Roses on a Cake
Creating elegant roses on a cake can be achieved with a few simple steps and the right technique. Here’s a step-by-step guide:
- Tools Needed: A fine-tipped pastry bag or decorator, buttercream, and optionally, a third shade of pink icing for detail work.
- Prepare the Icing: Fill the pastry bag with buttercream. For more control, consider using a disposable bag and cutting the tip slightly smaller than the size of the rose petals you want.
- Create the Base: Start by piping a small circle (the base of the rose) on the cake. This serves as your starting point.
- Add Petals: Holding the bag at a slight angle, pipe small “petals” around the base, working your way up. Alternate between slightly longer and shorter strokes to mimic the natural shape of a rose.
- Build the Rose Shape: As you go up, gradually increase the number of petals, creating layers. Vary the petal sizes slightly for a more realistic look.
- Finish the Rose: Once you reach the top, gently pull the bag away as you move it to create the final curve of the rose. Add a small dot in the center for the bud.
For best results:
- Practice on a piece of parchment paper before piping onto the cake.
- Take short breaks between each petal to keep your hand steady.
- Consider using a stiffer buttercream for detailed work.
If you’re struggling with getting the perfect rose shape, try warming the buttercream slightly. This makes it easier to control the flow and get smoother petals.
Looking to master more advanced techniques? Check out our cake decorating tutorials for more inspiration!
With these tips, you’ll be piping roses like a pro in no time. Happy baking!

0 Comments