


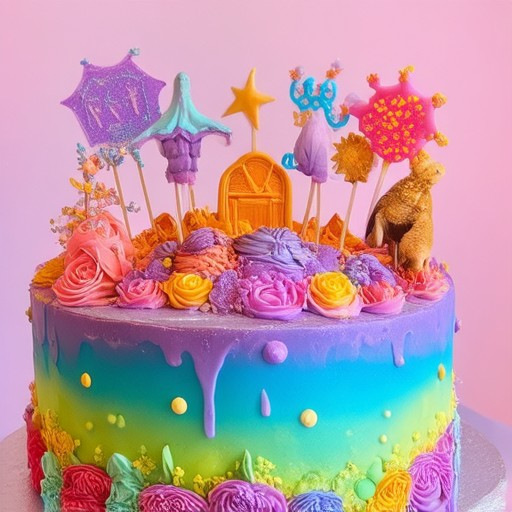
Transform your baked creations into visually stunning masterpieces with the art of crafting DIY edible cake toppers. Whether you’re celebrating a birthday, wedding, or simply elevating a plain cake, these customizable decorations add a unique flair that makes every dessert stand out. From elegant fondant designs to playful sugar sculptures, edible cake toppers offer endless possibilities for personalization. Discover how to make edible cake decorations that wow your guests while keeping your baking efforts hassle-free. With easy-to-follow tips and creative ideas, you’ll learn how to elevate your cakes to new heights of sophistication and fun.
Key Takeaways
– DIY Edible Cake Toppers Add Personalized Touches to Celebrations.
– Customize Designs to Match Event Themes and Preferences.
– Use Pliable Fondant or Flexible Sugar Sheets for Detailed Work.
– Apply Topper Within 30-60 Minutes for Best Results.
– Follow Safety Guidelines to Ensure Edible Treats Are Safe.
– Combine Materials for Intricate Designs and Unique Textures.
– Explore Creative Tools Like Laser Cutters for Precision.
– Utilize Adhesive or Icing for Secure Placement.

Creating Customizable Edible Cake Toppers
To create customizable edible cake toppers, follow these simple steps:
- Materials Needed: – Fondant (can be store-bought or homemade) – Cookie cutters or stencil shapes – Lollipop sticks or edible glue – Food coloring (gels, powders, or liquid) – Decorative elements (sprinkles, edible markers, glitter) – Optional: Stencil patterns or printed templates
- Step 1: Prepare the Fondant – Knead the fondant on a clean, flat surface until it becomes smooth and pliable. – Roll out the fondant to a thickness of about 1/8 inch (3mm) for easiest manipulation.
- Step 2: Cut Shapes – Use cookie cutters or a rolling pin guided by stencils to cut out your desired shapes from the fondant. – For intricate designs, consider using a bench scraper or knife for precise cuts.
- Step 3: Decorate the Shapes – Color the fondant using food coloring. Apply colors with brushes or sponges for vibrant results. – Enhance details with edible markers, gold/silver dust, or sprinkle toppings for extra flair.
- Step 4: Attach to the Cake – Insert lollipop sticks into the bottom of each topper for a sturdy base. – Gently press the decorated shapes onto the cake using edible glue or place them with the stick inserted into the cake itself.
- Step 5: Customize and Arrange – Arrange the toppers around the cake for a cohesive look, matching the event theme. – Allow the glue to set completely before serving to prevent shifting.
- Design Ideas: – Explore our cake decorating tutorials for inspiration based on the occasion, whether it’s birthdays, weddings, or seasonal celebrations. – Consider popular themes like Christmas trees, Halloween pumpkins, or wedding-themed designs.
- Alternative Methods: – For a quicker approach, use pre-made fondant sheets or opt for gumpaste for more durability. – Experiment with different sizes and colors to match the cake’s size and decoration style.
- Safety Tips: – Use food-safe dyes and ensure all ingredients are non-toxic. – Check for any dietary restrictions or allergies before serving the decorated cake.
How to Make Simple, Customizable Edible Cake Toppers
Creating decorative and personalized cake toppers is a fun and easy project perfect for any occasion. Whether it’s a birthday, wedding, or celebration, these edible decorations can elevate your cake to perfection. Here’s a step-by-step guide to crafting your own:
- Materials Needed:
- Fondant or sugar sheets
- Cake decorator tools (cutters, stamps)
- Food coloring gel or liquid
- Edible glue or buttercream
- Laser cutter or scissors
- Templates or freehand design skills
- Step 1: Prepare Your Fondant
- Knead the fondant until it’s pliable and smooth.
- Roll it out to your desired thickness using a rolling pin.
- Place a sheet of parchment paper on a flat surface to work on.
- Step 2: Cut Out Shapes
- Use your cake decorator tools to cut out shapes from the fondant.
- For intricate designs, consider using a laser cutter for precision.
- Freehand designs if you’re comfortable with shaping.
- Step 3: Decorate with Colors
- Dip your brushes or applicators in food coloring gel for vibrant hues.
- Add details like flowers, letters, or patterns using edible glue or buttercream.
- Mix colors to create unique shades and blend effects.
- Step 4: Personalize Your Design
- Add names, dates, or special messages using edible ink or glue.
- Consider adding quotes or sayings relevant to the occasion.
- Make sure the text is readable and centered for maximum impact.
- Step 5: Attach to the Cake
- Squeeze a small amount of buttercream or edible glue onto the back of each topper.
- Pick up the topper gently and place it on the cake.
- Press lightly to secure it in place and ensure it sticks well.
Tips for Success:
- Practice on scrap fondant before attempting your final design.
- Keep spare fondant and tools ready for touch-ups.
- Work in a cool, dry environment to prevent fondant from melting or drying out.
- Store unused toppers in an airtight container until needed.
With these simple steps, you can create professional-looking cake toppers that are completely customizable to match any occasion. Whether you’re a seasoned baker or a DIY enthusiast, this method ensures your cake stands out with style and personality!
Looking for more inspiration? Explore our cake decorating tutorials and discover countless ways to enhance your baking creations. Happy decorating!
Creating Customizable Edible Cake Toppers
Edible cake toppers are a fun and creative way to personalize your cakes for various occasions. Here’s a step-by-step guide to making your own customizable edible cake toppers:
Step 1: Select Your Base Material
Choose a base material that is easy to mold, set, and decorate. Common options include:
- Gummy bears – Known for their chewy texture and versatility
- Marshmallows – Can be shaped and decorated similarly
- Rice Krispies treats – Malleable and easy to form
Step 2: Customize Colors
Use food-safe coloring agents to customize the base material. Options include:
- Food-safe dye
- Edible ink pens
- Colored sugar or sprinkles
Ensure all colors are non-toxic and suitable for consumption.
Step 3: Decorate with Safe Items
Add decorative elements using safe, edible items such as:
- Sprinkles
- Edible glitter
- Small chocolate pieces
- Nuts (if desired)
Avoid using toxic or sharp objects that may pose a hazard.
Step 4: Secure Decorations
Attach decorations firmly to ensure they stay in place. Methods include:
- Toothpicks inserted into the base material
- Food-safe adhesive dots
- Durable clips or holders
Step 5: Let Set Properly
Allow the toppers to set completely before use. Gummy bears typically take around 24 hours to harden sufficiently.
Step 6: Consider Alternative Materials
For a different look, try using:
- Cheese slices – Moldable and customizable
- Candy melts – Can be melted and poured into molds
- Gelatin-based shapes – Easy to form and decorate
Step 7: Personalize Designs
Customize your toppers based on the occasion. Popular choices include:
- Birthday parties – Superheroes, animals, or numbers
- Weddings – Hearts, doves, or rings
- Holidays – Pumpkins, trees, or Santa clauses
Step 8: Offer Design Inspiration
Provide design ideas to inspire your customers, such as:
- Holiday-themed toppers
- Wedding favors
- Kids’ party characters
Step 9: Ensure Safety and Storage
Store finished toppers in airtight containers to maintain their freshness and prevent sogginess. Keep them in a cool, dry place until ready to use.
By following these steps, you can create colorful, customizable edible cake toppers that add a unique touch to any occasion.
How to Create Customizable Edible Cake Toppers
Creating customizable edible cake toppers involves several steps, from designing to application. Here’s a detailed guide:
- Choose Your Design or Message : Decide on the theme or message you wish to convey. Whether it’s “Happy Birthday” or a custom logo, ensure it aligns with the occasion.
- Select Materials : Opt for either fondant for a pliable, edible option or pre-made edible sheets for simplicity. Consider combining materials for intricate designs.
- Cut or Print Your Design : Use cookie cutters or stamps for shapes, or employ a specialized printer with edible ink for detailed texts or logos. For complex designs, consider using a laser cutter for precision.
- Apply the Topper : Place the topper gently on top of the frosted cake. For fondant, press firmly; for printed sheets, utilize adhesives or a dab of frosting as glue.
- Ensure Stability and Safety : Check that materials are food-safe. Store leftovers properly to maintain their texture and edibility.
- Consider Occasion and Complexity : Tailor designs to the event—elaborate for weddings, simpler for birthdays. Adjust application techniques based on complexity.
- Timing is Key : Apply toppers within 30-60 minutes of frosting to prevent melting or messiness.
- Include Tips and Ideas : Offer advice on handling materials, combining different mediums, and additional decoration suggestions for various events. Experiment with color mixes for vibrant designs and consider layering materials for unique textures.
Tailor your edible cake toppers to match the occasion, apply within 30-60 minutes, and explore tips for a perfect finish! For more inspiration and detailed guides, visit Tort Decor and discover our collection of cake decorating tutorials and recipes.

Creating Simple Edible Cake Toppers
Edible cake toppers are a fun and creative way to enhance any celebration. Whether it’s a birthday, wedding, anniversary, or seasonal event, these toppers can add a personal touch to your dessert. Here’s a step-by-step guide to crafting simple yet elegant cake toppers using fondant, dough, or sugar sheets:
- Material Preparation: – Fondant: Known for its pliability, fondant is ideal for creating detailed shapes. – Dough: Can be rolled and cut for simpler designs. – Sugar Sheets: Thin and flexible, perfect for intricate patterns.
- Tools Needed: – Rolling pin – Cookie cutters (various shapes: hearts, stars, numbers, etc.) – Spatula or scraper – Small cutter set – Food coloring (powder or gel) – Edible markers or glitter/luster dust – Icing or adhesive for secure placement
- Design Ideas: – Birthday Cakes: Use shapes like balloons, candles, or numbers. – Wedding Cakes: Opt for doves, rings, or floral motifs. – Anniversary Cakes: Feature milestone numbers or significant dates. – Seasonal Cakes: Incorporate holiday symbols like pumpkins, trees, or eggs.
- Step-by-Step Instructions: 1. **Prepare the Material:** Roll out your chosen material on a clean, flat surface. 2. **Cut Shapes:** Use cookie cutters to create your desired designs. 3. **Decorate:** Enhance with food coloring, edible markers, or glitter for added flair. 4. **Attach:** Place toppers gently on the cake using a dab of icing or adhesive. 5. **Serve:** Display the decorated cake for maximum impact.
- Storage Tips: – Store unused toppers in an airtight container. – Keep individual pieces separated to maintain their shape and color.
- Additional Tips: – Practice with scrap material to refine your techniques. – Consider varying sizes for different uses, such as mini toppers for cupcakes. – Ensure all materials are food-safe and free from harmful chemicals.
By following these steps, you can create charming and durable edible cake toppers that elevate your desserts to new heights, perfect for any occasion.
0 Comments